Hi guys.
I have finished the BRDM-2. It only took two days. If areas look damp or wet, its probably just thinners that have not dried yet.
Before I begin, All oil paints used are from the exceptional Mig range. I highly recommend these as they perform superbly every time. I have used them on every build since I got them.
-Chips on the camo were done with Vallejo Model Colour Russian Green and the chips on the base coat were done with a lighter green and dark grey.
-A general wash was done with a black/grey oil mix. A dark brown oil mix was then used to streak the side panels. I hand painted the numbers and symbols using white acrylic.
-The periscopes and head lights were painted Games WorkShop Ice Blue which was then coated with Tamiya Gloss Varnish.
-The shovel blade was painted a dark silver. The tip was then drybrushed a ligher silver to give the effect of use.
-The exhaust was painted matt black and then given a brown wash to achieve a mucky base. A rust powder was the applied and coated in thinners to fix it down. A brush loaded with thinners was used to remove some of the pigment. Graphite was then rubbed over the exhaust and black powder was put on the tip.
-The oil stains were made using Miguel Jimenez's amazing Engine Grease oil paint. It is my favorite tool for oil stains!
-Wheels were painted matt black and then coated in a home-made mud mix. It was made using polyfiller, sand, tiny pieces of dried grass and static hedge. After drying, the wheels were buffed to leave it only in the tread. It was then painted a grey/brown washed with brown oil paint. I then speckled the wheels with various tones of brown oil paint to re-create mud splatters. The same process was used on the lower hull.
Sunday, 27 January 2013
Wednesday, 23 January 2013
1/35 Dragon BRDM-2 (Part 2)
Tuesday, 22 January 2013
1/35 Dragon BRDM-2 (Part 1)
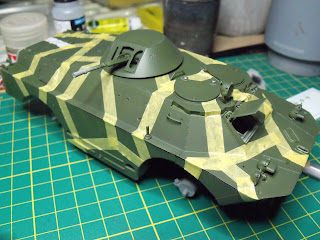
This is a project I am doing for a campaign on Armorama (Next Gen 2). I have a couple of the new Trumpeter kits but settled on this due to it's fast construction and ease of build. I got it at Telford for £5 and it came with PanzerShop resin tyres! I have built it OOB except for two wire handles and wheels. I started by spraying it Halford's Grey Primer followed by a per-shade of white and black. I then coated this in Vallejo Model Air Russian Green. I have masked it off in preparation for praying the camo. I plan on doing it in a three toned splineter patten.
I painted the Topas-2AP in the Summer and is from ACE. It displays what I hope to achieve. The Topas is 1/72 and was quite a good kit to build apart from the tracks/wheels which were horrible. I added the weld seams to fill the gaps. I made quite a few wire parts but many have fallen off.
The picture of a split tyre is one from another of my Dragon BRDM-2s. 3 out of 4 of the tyres that came with that kit were virtually unusable. If you are thinking of getting a Dragon BRDM, be wary of this as I have heard this is a common problem.
Stay Tuned
Subscribe to:
Comments (Atom)
.JPG)
.JPG)
.JPG)
.JPG)
.JPG)
.JPG)
.JPG)
.JPG)
.JPG)
.JPG)
.JPG)
.JPG)
.JPG)
.JPG)
.JPG)
.JPG)
.JPG)
.JPG)
.JPG)
.JPG)
.JPG)
.JPG)
.JPG)
.JPG)
.JPG)
.JPG)
.JPG)
.JPG)
.JPG)
.JPG)
.JPG)
.JPG)
.JPG)
.JPG)
.JPG)


.JPG)
.JPG)
.JPG)
.JPG)
.JPG)
.JPG)
.JPG)
.JPG)
.JPG)
.JPG)
.JPG)
.JPG)
.JPG)


.JPG)

.JPG)
.JPG)