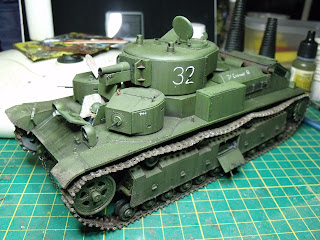
Now to the weathering!!
I started off by painting various part a lighter tone of the base colour which helped break up the large green panels. As usual, I painted my own decals. I know Bison or Archer would be better, and I really want to get some dry transfer, but in the interest of speed and 'painted on look', I just did them myself (I also like to live dangerously - haha). A large '32' was done on the left hand side of the turret with a white, vertical bar on the right. The left engine deck vent also got the treatment. 'Za Stalina' (For Stalin) was painted onto it. The left hand side mini-turret received 5 tally marks just to add a little interest.
From here, I moved onto chipping. My regular process of Vallejo Olive Green was applied with a brush for the large chips, followed by the sponge for the smaller ones. Once dry, Vallejo Black Grey was used to fill them in creating a slightly 3D effect. On a few heavy chips, a dark brown colour was made to emulate corroded, bare metal.
Next came the washes. As always, the superb, Mig Abteilung Oils were used. Dozens of different tones of blacks and browns were created and applied to every surface on the model. I tried to use slightly varying hues so as to make each panel similar but not bland. The two periscope towers on the turret roof were surrounded by brown oils and then this was stippled to recreate built-up grime. Black dots of oils were then placed along the tops of all vertical/sloping surface and streaked downward. This was done with a few other colours such as orange and brown, however it was in much smaller quantities to the black. I humbly tried Adam Wilder's technique, Speckling as I have found it to yield a nice effect (nowhere near as good as the mighty Adam though). Acrylic light green was first used followed by dark brown, orange and black.
I did not use much pigment on this model as oils seemed to be doing most of the work this time. However, I did tap some around the mounts small turrets. I got a dry brush and began working it in. To my disgust, it looked awful. In a attempt to remove it I got a wet brush and swirled it about. Thinking I had ruined it, I was amazed when it had dried and looked better than what I set out to achieve in the first place. i dunno if you think it looks good but I like it. The panels that create the enclosure for the 'baby turrets' have a dark dirt fading up them, see if you can spot it.
Mud was made using Treemendus Forest Floor, river bank sand, polyfiller and many other random things. To this I added Vallejo German Camo Green. I then stippled around the entire lowerhull and tracks. Washes and pigments then followed. I am still unhappy about the colour of the mud and is the one thing I would change.
I have not completely finished it (only 1 or 2 tiny adjustment to make) overall I have throughly enjoyed this project and really wish this kit was more widely available (hint hint Trumpeter ;) ) I recommend the ICM kit to anyone as the detail is great and building is really easy. Although the kit only cost me a tenner, I then spent £25 on track, £10 on etch and £5 on the barrel. Despite this, a superb model can be built OOB. It was the fact the model came with the wrong track and that I 'mauled' the kit supplied short barrel which forced me into spending £30. The etch was just for fun.
I'll hopefully get some better pics up soon with a white background.
Thanks for looking
Euan


.JPG)
.JPG)
.JPG)
.JPG)
.JPG)
.JPG)
.JPG)
.JPG)
.JPG)
.JPG)
.JPG)
.JPG)
.JPG)
.JPG)
.JPG)
.JPG)
.JPG)
.JPG)
.JPG)
.JPG)
.JPG)
.JPG)
.JPG)
.JPG)
.JPG)
.JPG)
.JPG)
.JPG)
.JPG)
.JPG)
.JPG)
.JPG)
.JPG)
.JPG)
.JPG)
.JPG)
.JPG)
.JPG)
.JPG)
.JPG)
.JPG)
No comments:
Post a Comment