Sunday, 19 May 2013
1/35 Skif BMD-1P - Part 2
Hey guys,
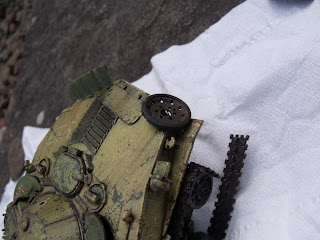
After some time on the shelf I decided to take the BMD down and muck about. With only a week or so until Perth, I thought I might as well try and get it finished, something else I could enter. I remembered I had previously sprayed it green in preparation for the chipping so was quite pleased I could paint it yellow right away. By brush, I applied various tones of Dunkle Gelb to create a worn, Iraqi look. To add a bit of variety, I painted the hatches a faded green to suggest they had been pilfered from other vehicles. Graffiti was then added in the form of names, dates and symbols to mimic 'tagging; by Coalition troops and locals. The engine bay was painted a duck-egg blue to further increase the contrast. Several tones of pigments and oils were used to create a manky feel. I lost one of the machine gun ports so was forced to use half a road wheel to cover it. My story is that the previous user had used it to stop sand etc getting in. ;) The left hand side head light was removed and put on the end of a piece of wire as if it was dangling.
Once I was satisfied with the base, a layer Vallejo Matt was used and weathering could commence.
A dark brown oil wash was the first one followed by a pin wash of a more intense, dark tone. A generic, dirty brown was created and pooled around hatches and in recesses. Another coat of Matt was put on and from here I moved on to streaking. Orange oil paint was dotted onto various parts of the model and then dragged down imitating running rust. Black was also used for the vents at the back. Diluted black was utilized to start the spillages around what I think are fuel caps (even if they're not I probably could'nt have resisted anyway). Abteilung 'Engine Grease' played the part of thicker, more recent oil spills. The tracks were given a dusting with several earth pigments but need further weathering. The Arabic writing was hand painted using a brush.
Enjoy (sorry for the vagueness but I left a month or two between finishing it and writing this so have forgotten most of what I did :( )
Sunday, 12 May 2013
1/35 Wespe Models S-2 - Part 1
Hey guys,
I got this at Perth Model show a couple of weeks ago. For £25 I was pretty pleased. It was marked down from £90! (Strangely, the Wespe website sells it for 65 Euros. Maybe cause its a slightly older model?) Regardless, its a vary nice kit and has a respectable part count. The larger pieces were nicely done, However, some warpage is present on the flatbed section. Until this is fixed I cannot progress.
I have done the cab interior and fitted the windows (A very high quality sheet of clear plastic is supplied)
A duck egg blue was used for the cab interior and Vallejo Black Grey chips applied on top. A wash of Abteilung 502 Brown Wash created a basic dirty feel. Once dry, various pigments were mobilized to represent dust and muck. Finally some orange powder was added to imply rusting. Like the Totopet, I have not done the best for the interior but again, it will be mostly hidden as the doors cannot be opened. There are also some pics of an idea for stowage. (I dunno why haha)
Enjoy and stay tuned...
Soviet Armoured Column - Part 2
Hey guys, sorry for the long absence. :(
I've been continuing with my column and am hopefully going to get the BTR-60 and BRDM-2 interiors sprayed soon. Once this is done they will be sealed and the exteriors will be primed. I am still trying to find a reasonably cheap Trumpeter Zil-157. When I've got that bought and built I'll let you know but for now progress is slow. I have however managed to build the other BTR-60 and do the interior of the Totopet. I did'nt make the best job of the interior and am relying on the small windows hiding it. Speaking of windows, I have replaced the kit supplied ones with bits of clear plastic from a blueberry box. The part that is supposed to be the windows is way too thick, scratched and misty. It is just one large slab. Anyway, hope you like it. My old Ural-4320 is standing in to represent the Zil.
Subscribe to:
Posts (Atom)
.JPG)
.JPG)
.JPG)
.JPG)
.JPG)
.JPG)
.JPG)
.JPG)
.JPG)
.JPG)
.JPG)
.JPG)
.JPG)
.JPG)
.JPG)
.JPG)
.JPG)
.JPG)
.JPG)
.JPG)
.JPG)
.JPG)
.JPG)
.JPG)
.JPG)


.JPG)
.JPG)
.JPG)
.JPG)
.JPG)
.JPG)
.JPG)
.JPG)
.JPG)
.JPG)
.JPG)
.JPG)


